Sunday, April 22, 2012

Kool aid dying

Whenever I read about something, I nearly always have to try it. I have no real interest in custom dying yarn, but this sounded like fun. Turns out, it is. The problem is what I decided to do with the dyed yarn. The project I settled on was a fair isle sweater manually patterned on the Bond. The process was slow and tedious and I haven't gotten farther than making one piece. Plus there's my tendency to work on a project till I find something else that catches my attention, and then the first project gets put on hold indefinitely. That's why updates here are far between. Here's what I've got so far:
Looks pretty good, but I don't know about that bright blue. Kool aid is limited in the blues available, so this is the best I could do. I really wanted to include the whole spectrum because it was so heavy on reds. The plan was to have warm stripes alternating with cool stripes with yellow being the unifier. I don't think the blue is quite as loud in person.

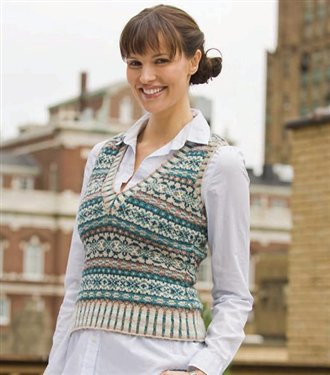
The pattern is one I dug up on the internet. Getting a pleasing color sequence turned out to be quite difficult. I tried many combinations before settling on this one. It was accomplished using the two carriage technique. I highly recommend this to anyone who does fair isle on the Bond. It is far preferable to hand knitting every contrast stitch.

The dying is quite easy and there's no science to it. The yarn will absorb all the dye from the bath, leaving the water clear. The quantity of kool aid in the bath determines the intensity. Due to the nature of the process, you can't really stop once you like the color, so you have to start with the right amount of powder rather than try to stop early. It's well documented on the web, so I'm not going to give the particulars. When it's cool, rinse it well, and most of the smell will come out in the rinse. I believe this only works with natural fibers, or it could be only wool. I'm not sure. I used Knit Picks Wool of the Andes. The hot water will cause the wool to felt, so don't agitate it too quickly or it will ball into a prickly mess. Also, if you're trying to match dye lots, make careful notes about the quantity of powder used. Even then, the results are unpredictable. I haven't washed this yet, so I don't know how colorfast it is. I've read that it doesn't fade but don't know for sure.

Another painting

This is something I saw while riding on the interstate during winter many years ago. I'd been wanting to do a painting of it for years, but I didn't think I'd be able to do much with it. After doing a couple of Bob Ross paintings and learning a few techniques, I thought I might be able to pull it off. Not great, but it looks pretty cool. I can probably do a better one in future.

For some reason, this doesn't photograph well. In real life the colors are vibrant and distinct, unlike in this washed out photography. I tried all kinds of shots, and nothing was really satisfactory. Take my word for it, it looks better in person. I do wish, however, that I hadn't tried to put stars in the sky.

Sunday, April 15, 2012

Ivy League Vest

I wanted to make a fair isle vest in reds and browns, so I settled on Eunny Jang's Ivy League vest.
It's all nice and tight on the model. Mine came out rather loose:
The colors look unnatural in flash photography, but in real life, they aren't this loud. The yarn is Palette by Knit Picks.

I know I said in an earlier post that I was done with hand knitting, but machine knitting this wasn't going well. I punched a card for it and started knitting, changing colors as needed. The color changes were pretty tedious, and every mistake required ripping out the row and resetting the row counter and punch card. The last straw was when I got yarn wrapped around one of the patterning drums. I was pretty irritated and ripped hard on the yarn, damaging the drum. That's when I resigned myself to hand knitting the project.

The gauges between the hand knit and machine knit products were vastly different:
I can see now that I was knitting much too tightly on the machine. You don't know how well or poorly you're doing until you actually take it off the machine. The swatch I made was nowhere near this tight. Owing to the complex shaping and neckline, I had planned to cut and sew this vest by making rectangles of fabric on the machine and seaming them on the sewing machine. Plus the machine knit sample just looks better because all the stitches are the same size. Mine are all over the place.

My hand knitted gauge wasn't right either and I had to omit rows to get the length right. The stitches per inch were the same as the given gauge, yet the vest is still too loose. It is unfinished in the photo above, but we had one cool day this spring and I knew I wouldn't have another chance to wear it for a long long time. I expect I'll have a go at shrinking it after I've dealt with the strings.

Steeks are pretty neat. This vest was knitted round with steeks placed at the armholes and neck as placeholders to be cut out later. You still shape the armhole and neck as normal, then knit across the steeks to the next section in order to continue knitting round all the way to the shoulder bind offs.

66 Update

Good news on the 66 front! There's going to be a decal source soon which has renewed my interest in the project. I ordered the electroless nickel plating kit from Caswell and now I have just about all I need to get the show on the road. The kit looks extremely complicated.
It came with a custom printed manual an inch thick, and two little stockpots. You have to make all these calculations about the area of the piece being plated and how much nickel in the bath is being consumed so you can replenish it as it is depleted. Looks like a job for a weekend.

Quite some time ago, I started painting the head black, but I used a brush because I wanted to build up a thick coat like the original Japanning and then spray on some thinner ones. Considering how much sanding is required to remove the brush strokes, I'll probably be back down to the primer when I'm done. Perhaps it wasn't the best decision.

The next steps are to finish sanding the head and prep the metal parts for plating. Shiny ones like the throat plate will need to have a mirror finish if they are to look anything like they used to. I could just buy new ones, but that conflicts with the original plan of only replacing parts that I can't restore sufficiently, like the etched chrome covers. I especially want to save the slide cover because it has patent dates stamped on it, all before 1910. The goal was to do this cheaply, but I don't know if that's going to be feasible. I figured the cost of the plating kit would be lower than buying all the parts piecemeal.

I showed the handwheel in an earlier post. It still looks the same. Since the plating process is finicky about absolute cleanliness of the metal, I may be able to only plate the outside diameter and leave the spoked part for painting. I don't really want to buy another one, as it has the potential to be very expensive for this budget.

Let's recap the spending so far: we were up to $82 and the plating kit was another 80. That makes $162 and hopefully there won't be much more to buy. I'm using a lot of supplies that I already had, like black paint. However, I did buy supplies to do a hand crank conversion since I used the treadle table on the 306: $45 for a handmade wooden base that will have to be stained, and $12 for a hand crank. I'm basing my budget on machines for sale on ebay, which are often in rough shape and sold with no base or table, yet still have high prices.